23 Sep

Colour console output in Java

Wondering how to colour System.out.println console output in Java? Use standard ANSI escape sequences (just concatenate them with your output, and use ANSI_RESET to go back to default). This works in Linux, MacOS, Windows Powershell and Cygwin on Windows. It DOESN’T work in Windows Command Prompt.

Here are some handy constants:

public static final String ANSI_RESET  = "\u001B[0m";

public static final String ANSI_BLACK  = "\u001B[30m";
public static final String ANSI_RED    = "\u001B[31m";
public static final String ANSI_GREEN  = "\u001B[32m";
public static final String ANSI_YELLOW = "\u001B[33m";
public static final String ANSI_BLUE   = "\u001B[34m";
public static final String ANSI_PURPLE = "\u001B[35m";
public static final String ANSI_CYAN   = "\u001B[36m";
public static final String ANSI_WHITE  = "\u001B[37m";

public static final String ANSI_BRIGHT_BLACK  = "\u001B[90m";
public static final String ANSI_BRIGHT_RED    = "\u001B[91m";
public static final String ANSI_BRIGHT_GREEN  = "\u001B[92m";
public static final String ANSI_BRIGHT_YELLOW = "\u001B[93m";
public static final String ANSI_BRIGHT_BLUE   = "\u001B[94m";
public static final String ANSI_BRIGHT_PURPLE = "\u001B[95m";
public static final String ANSI_BRIGHT_CYAN   = "\u001B[96m";
public static final String ANSI_BRIGHT_WHITE  = "\u001B[97m";

public static final String[] FOREGROUNDS = {
        ANSI_BLACK, ANSI_RED, ANSI_GREEN, ANSI_YELLOW,
        ANSI_BLUE, ANSI_PURPLE, ANSI_CYAN, ANSI_WHITE,
        ANSI_BRIGHT_BLACK, ANSI_BRIGHT_RED, ANSI_BRIGHT_GREEN, ANSI_BRIGHT_YELLOW,
        ANSI_BRIGHT_BLUE, ANSI_BRIGHT_PURPLE, ANSI_BRIGHT_CYAN, ANSI_BRIGHT_WHITE
};

public static final String ANSI_BG_BLACK  = "\u001B[40m";
public static final String ANSI_BG_RED    = "\u001B[41m";
public static final String ANSI_BG_GREEN  = "\u001B[42m";
public static final String ANSI_BG_YELLOW = "\u001B[43m";
public static final String ANSI_BG_BLUE   = "\u001B[44m";
public static final String ANSI_BG_PURPLE = "\u001B[45m";
public static final String ANSI_BG_CYAN   = "\u001B[46m";
public static final String ANSI_BG_WHITE  = "\u001B[47m";

public static final String ANSI_BRIGHT_BG_BLACK  = "\u001B[100m";
public static final String ANSI_BRIGHT_BG_RED    = "\u001B[101m";
public static final String ANSI_BRIGHT_BG_GREEN  = "\u001B[102m";
public static final String ANSI_BRIGHT_BG_YELLOW = "\u001B[103m";
public static final String ANSI_BRIGHT_BG_BLUE   = "\u001B[104m";
public static final String ANSI_BRIGHT_BG_PURPLE = "\u001B[105m";
public static final String ANSI_BRIGHT_BG_CYAN   = "\u001B[106m";
public static final String ANSI_BRIGHT_BG_WHITE  = "\u001B[107m";

public static final String[] BACKGROUNDS = {
        ANSI_BG_BLACK, ANSI_BG_RED, ANSI_BG_GREEN, ANSI_BG_YELLOW,
        ANSI_BG_BLUE, ANSI_BG_PURPLE, ANSI_BG_CYAN, ANSI_BG_WHITE,
        ANSI_BRIGHT_BG_BLACK, ANSI_BRIGHT_BG_RED, ANSI_BRIGHT_BG_GREEN, ANSI_BRIGHT_BG_YELLOW,
        ANSI_BRIGHT_BG_BLUE, ANSI_BRIGHT_BG_PURPLE, ANSI_BRIGHT_BG_CYAN, ANSI_BRIGHT_BG_WHITE };
05 Jun

zsh and oh-my-zsh on Cygwin

I prefer to do things on the command line rather than click around on a UI (I type much faster than I can use a mouse). And I absolutely love the zsh and oh-my-zsh combination for my terminal. I mostly use a Mac (with iTerm2) and various flavours of Linux – all of which are really straight forward to set up. But sometimes I have to use Windows – and to keep to a Unix style shell (mostly because I know the commands much better), I use Cygwin as a shell when on Windows.

There are some instructions out there on getting zsh and oh-my-zsh set up on Cygwin, but I’ve always found that I need to combine a few of them to get the right setup, and I don’t do it often enough to remember. So I’m writing it down here – mostly for myself!

Cygwin setup

Start with a standard Cygwin installation – and I’m assuming you use the standard shortcut to start a shell that uses mintty.exe.

Use the standard Cygwin installer to install the latest versions of the following packages:

  • git
  • wget (or curl – you only need one of the two)
  • zsh

oh-my-zsh installation

  • Launch a Cygwin shell
  • Run the appropriate wget or curl command to download and install oh-my-zsh from the standard instructions.
    • With wget
      • sh -c "$(wget -O- https://raw.githubusercontent.com/robbyrussell/oh-my-zsh/master/tools/install.sh)"
    • With curl
      • sh -c "$(curl -fsSL https://raw.githubusercontent.com/robbyrussell/oh-my-zsh/master/tools/install.sh)"
  • Exit the shell

Make zsh the default

You now have zsh and oh-my-zsh installed, but the default shell (when you double-click the icon) will still be bash (you need to execute zsh to change to it). Lets make zsh the default shell for your shortcut icon.

  • Right click the icon you use to launch Cygwin and select Properties.
  • In the Target field, change it to the following (replacing <cygwin-folder> with the actual folder where Cygwin is installed):
    • c:\<cygwin-folder>\bin\mintty.exe -i /Cygwin-Terminal.ico /usr/bin/zsh --login -
    • (The important bits where adding here is /usr/bin/zsh --login - if you miss the --login part the shell will misbehave and not find a lot of executables).
  • Try it out – if you now run a shell and execute echo $SHELL you should get back /bin/zsh

Customise oh-my-zsh

You can now customise zsh and oh-my-zsh as usual by modifying the contents of .zshrc in your (Cygwin) home directory. If you must know, I use either the agnoster theme, or a heavily customised version of powerlevel9k – they both have fantastic git support.

Powerline fonts

Some of these themes (and both that I mention above) require the Powerline fonts to be installed to get special characters.

  • In a Cygwin shell, in your home directory, execute git clone https://github.com/powerline/fonts.git --depth=1
  • Close the Cygwin shell.
  • Open Windows PowerShell as an Administrator (Window Key + X then select “Windows PowerShell (Admin)” and select “Yes”.) Change back to the directory where the “fonts” repository was downloaded (e.g. cd \<cygwin-dir>\home\<myuser>\fonts).
  • In the PowerShell, execute Set-ExecutionPolicy Bypass – accept the warning.
  • Execute .\install.ps1 – this will run the PowerShell script to install the fonts – it will take a while.
  • When done, reset your execution policy by executing Set-ExecutionPolicy Default and accept the warning.
  • You can now change the font in your mintty.exe setup to use a Powerline font.

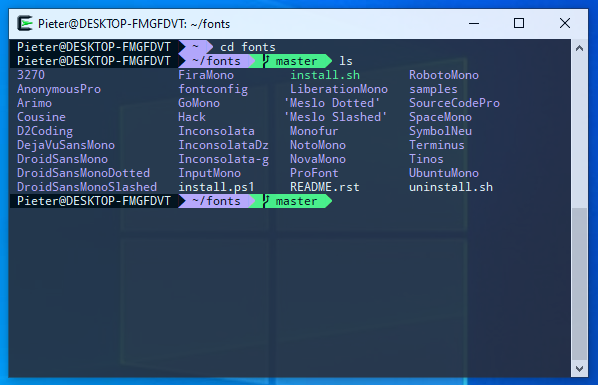
This shows a screenshot with colour scheme “dracula”, transparency set to “Medium”, font “Noto Mono for Powerline” 9pt.

17 May

Java: Read contents of resource file to String

If you have a resource text file – even if packaged in a JAR file – you can use the following Java 8(+) code to read the contents into a String. This code will also work in a static method (hence the ClassLoader.getSystemClassLoader()). If you’re in a normal method you can use the current instance’s classloader instead.

String contents = "";
ClassLoader classLoader = ClassLoader.getSystemClassLoader();
InputStream inputStream = classLoader.getResourceAsStream(filename);
if (inputStream != null) {
        BufferedReader reader = new BufferedReader(new InputStreamReader(inputStream));
        contents = reader.lines().collect(Collectors.joining(System.lineSeparator()));
}