14 Jan

Configure Wifi and SSH on Raspberry Pi – Headless

Want to configure a new Raspbian OS to connect to your wifi and to enable SSH without bothering to plug in a monitor or keyboard?

After imaging the SSD card, plug it back into your computer.

To enable wifi – create a file called wpa_supplicant.conf in the /boot folder:

ctrl_interface=DIR=/var/run/wpa_supplicant GROUP=netdev
update_config=1
country=<Insert 2 letter ISO 3166-1 country code here>

network={
 ssid="<Name of your wireless LAN>"
 psk="<Password for your wireless LAN>"
}

To enable ssh, create an empty file called ssh in the /boot folder.

More information:

Then boot it up for the first time – wait a while!

09 Jul

Find columns with non-null data

Have tables with loads of columns and lots of data – mostly null – and want to know which columns across them actually has any data? Try this. Oracle specific though.

First, create a table that contains all the tables and columns you want to check – and some columns for processing output. You’ll monitor this table to check progress, and get the output from here in the end. Lets call this table COLS_TO_CHECK. You must have dba rights for this.

create table COLS_TO_CHECK as (
   select
      col.owner as schema_name,
      col.table_name,
      col.column_name,
      col.nullable,
      'N' as processed,
      ' ' as not_null
   from
      sys.dba_tab_columns col
   where
      col.owner = 'SCHEMA_OWNER_OF_TABLES_TO_CHECK'
      and col.table_name in ('LIST','OF','TABLES')
);

You can check progress later in this table – it will set “processed” to “Y” when done, and “not_null” to either “Y” or “N”, depending on whether that column has any data in it (“Y”) or whether all rows are null (“N”).

To actually check the data, run this PL/SQL (its going to be slow!). If it dies or gets killed, you can just re-run – it will carry on from where it last checked.

declare
   l_test_statement varchar2(32767);
   l_contains_value pls_integer;

   cursor c is
      select schema_name, table_name, column_name, nullable
      from COLS_TO_CHECK -- the table created above
      where processed = 'N';

begin
   for r in c
   loop
      if r.nullable = 'N'
      then
         update COLS_TO_CHECK set processed='Y', not_nul ='Y'
         where schema_name=r.schema_name
            and table_name=r.table_name
            and column_name=r.column_name;
         commit;
      else
         begin
            l_test_statement := 'select 1 from dual where exists (select 1 from ' || r.schema_name || '.' || r.table_name || ' where ' || r.column_name || 'is not null)';
            execute immediate l_test_statement
               into l_contains_value;
            update COLS_TO_CHECK set processed='Y', not_null='Y'
            where schema_name=r.schema_name
               and table_name=r.table_name
               and column_name=r.column_name;
            commit;
         exception
            when no_data_found then
               update COLS_TO_CHECK set processed='Y', not_null='N'
               where schema_name=r.schema_name
                  and table_name=r.table_name
                  and column_name=r.column_name;
               commit;
         end;
      end if;
   end loop;
end;
23 Sep

Colour console output in Java

Wondering how to colour System.out.println console output in Java? Use standard ANSI escape sequences (just concatenate them with your output, and use ANSI_RESET to go back to default). This works in Linux, MacOS, Windows Powershell and Cygwin on Windows. It DOESN’T work in Windows Command Prompt.

Here are some handy constants:

public static final String ANSI_RESET  = "\u001B[0m";

public static final String ANSI_BLACK  = "\u001B[30m";
public static final String ANSI_RED    = "\u001B[31m";
public static final String ANSI_GREEN  = "\u001B[32m";
public static final String ANSI_YELLOW = "\u001B[33m";
public static final String ANSI_BLUE   = "\u001B[34m";
public static final String ANSI_PURPLE = "\u001B[35m";
public static final String ANSI_CYAN   = "\u001B[36m";
public static final String ANSI_WHITE  = "\u001B[37m";

public static final String ANSI_BRIGHT_BLACK  = "\u001B[90m";
public static final String ANSI_BRIGHT_RED    = "\u001B[91m";
public static final String ANSI_BRIGHT_GREEN  = "\u001B[92m";
public static final String ANSI_BRIGHT_YELLOW = "\u001B[93m";
public static final String ANSI_BRIGHT_BLUE   = "\u001B[94m";
public static final String ANSI_BRIGHT_PURPLE = "\u001B[95m";
public static final String ANSI_BRIGHT_CYAN   = "\u001B[96m";
public static final String ANSI_BRIGHT_WHITE  = "\u001B[97m";

public static final String[] FOREGROUNDS = {
        ANSI_BLACK, ANSI_RED, ANSI_GREEN, ANSI_YELLOW,
        ANSI_BLUE, ANSI_PURPLE, ANSI_CYAN, ANSI_WHITE,
        ANSI_BRIGHT_BLACK, ANSI_BRIGHT_RED, ANSI_BRIGHT_GREEN, ANSI_BRIGHT_YELLOW,
        ANSI_BRIGHT_BLUE, ANSI_BRIGHT_PURPLE, ANSI_BRIGHT_CYAN, ANSI_BRIGHT_WHITE
};

public static final String ANSI_BG_BLACK  = "\u001B[40m";
public static final String ANSI_BG_RED    = "\u001B[41m";
public static final String ANSI_BG_GREEN  = "\u001B[42m";
public static final String ANSI_BG_YELLOW = "\u001B[43m";
public static final String ANSI_BG_BLUE   = "\u001B[44m";
public static final String ANSI_BG_PURPLE = "\u001B[45m";
public static final String ANSI_BG_CYAN   = "\u001B[46m";
public static final String ANSI_BG_WHITE  = "\u001B[47m";

public static final String ANSI_BRIGHT_BG_BLACK  = "\u001B[100m";
public static final String ANSI_BRIGHT_BG_RED    = "\u001B[101m";
public static final String ANSI_BRIGHT_BG_GREEN  = "\u001B[102m";
public static final String ANSI_BRIGHT_BG_YELLOW = "\u001B[103m";
public static final String ANSI_BRIGHT_BG_BLUE   = "\u001B[104m";
public static final String ANSI_BRIGHT_BG_PURPLE = "\u001B[105m";
public static final String ANSI_BRIGHT_BG_CYAN   = "\u001B[106m";
public static final String ANSI_BRIGHT_BG_WHITE  = "\u001B[107m";

public static final String[] BACKGROUNDS = {
        ANSI_BG_BLACK, ANSI_BG_RED, ANSI_BG_GREEN, ANSI_BG_YELLOW,
        ANSI_BG_BLUE, ANSI_BG_PURPLE, ANSI_BG_CYAN, ANSI_BG_WHITE,
        ANSI_BRIGHT_BG_BLACK, ANSI_BRIGHT_BG_RED, ANSI_BRIGHT_BG_GREEN, ANSI_BRIGHT_BG_YELLOW,
        ANSI_BRIGHT_BG_BLUE, ANSI_BRIGHT_BG_PURPLE, ANSI_BRIGHT_BG_CYAN, ANSI_BRIGHT_BG_WHITE };
05 Jun

zsh and oh-my-zsh on Cygwin

I prefer to do things on the command line rather than click around on a UI (I type much faster than I can use a mouse). And I absolutely love the zsh and oh-my-zsh combination for my terminal. I mostly use a Mac (with iTerm2) and various flavours of Linux – all of which are really straight forward to set up. But sometimes I have to use Windows – and to keep to a Unix style shell (mostly because I know the commands much better), I use Cygwin as a shell when on Windows.

There are some instructions out there on getting zsh and oh-my-zsh set up on Cygwin, but I’ve always found that I need to combine a few of them to get the right setup, and I don’t do it often enough to remember. So I’m writing it down here – mostly for myself!

Cygwin setup

Start with a standard Cygwin installation – and I’m assuming you use the standard shortcut to start a shell that uses mintty.exe.

Use the standard Cygwin installer to install the latest versions of the following packages:

  • git
  • wget (or curl – you only need one of the two)
  • zsh

oh-my-zsh installation

  • Launch a Cygwin shell
  • Run the appropriate wget or curl command to download and install oh-my-zsh from the standard instructions.
    • With wget
      • sh -c "$(wget -O- https://raw.githubusercontent.com/robbyrussell/oh-my-zsh/master/tools/install.sh)"
    • With curl
      • sh -c "$(curl -fsSL https://raw.githubusercontent.com/robbyrussell/oh-my-zsh/master/tools/install.sh)"
  • Exit the shell

Make zsh the default

You now have zsh and oh-my-zsh installed, but the default shell (when you double-click the icon) will still be bash (you need to execute zsh to change to it). Lets make zsh the default shell for your shortcut icon.

  • Right click the icon you use to launch Cygwin and select Properties.
  • In the Target field, change it to the following (replacing <cygwin-folder> with the actual folder where Cygwin is installed):
    • c:\<cygwin-folder>\bin\mintty.exe -i /Cygwin-Terminal.ico /usr/bin/zsh --login -
    • (The important bits where adding here is /usr/bin/zsh --login - if you miss the --login part the shell will misbehave and not find a lot of executables).
  • Try it out – if you now run a shell and execute echo $SHELL you should get back /bin/zsh

Customise oh-my-zsh

You can now customise zsh and oh-my-zsh as usual by modifying the contents of .zshrc in your (Cygwin) home directory. If you must know, I use either the agnoster theme, or a heavily customised version of powerlevel9k – they both have fantastic git support.

Powerline fonts

Some of these themes (and both that I mention above) require the Powerline fonts to be installed to get special characters.

  • In a Cygwin shell, in your home directory, execute git clone https://github.com/powerline/fonts.git --depth=1
  • Close the Cygwin shell.
  • Open Windows PowerShell as an Administrator (Window Key + X then select “Windows PowerShell (Admin)” and select “Yes”.) Change back to the directory where the “fonts” repository was downloaded (e.g. cd \<cygwin-dir>\home\<myuser>\fonts).
  • In the PowerShell, execute Set-ExecutionPolicy Bypass – accept the warning.
  • Execute .\install.ps1 – this will run the PowerShell script to install the fonts – it will take a while.
  • When done, reset your execution policy by executing Set-ExecutionPolicy Default and accept the warning.
  • You can now change the font in your mintty.exe setup to use a Powerline font.

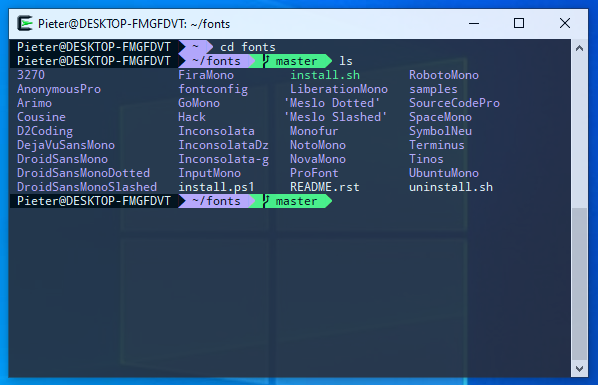
This shows a screenshot with colour scheme “dracula”, transparency set to “Medium”, font “Noto Mono for Powerline” 9pt.

17 May

Java: Read contents of resource file to String

If you have a resource text file – even if packaged in a JAR file – you can use the following Java 8(+) code to read the contents into a String. This code will also work in a static method (hence the ClassLoader.getSystemClassLoader()). If you’re in a normal method you can use the current instance’s classloader instead.

String contents = "";
ClassLoader classLoader = ClassLoader.getSystemClassLoader();
InputStream inputStream = classLoader.getResourceAsStream(filename);
if (inputStream != null) {
        BufferedReader reader = new BufferedReader(new InputStreamReader(inputStream));
        contents = reader.lines().collect(Collectors.joining(System.lineSeparator()));
}
24 Apr

First Alexa Skill

We have a very simple and silly Alexa skill live – just because we can. It gives you silly ideas for inspiration. Its called “Thought Leader Craig“, and you can find it in the Alexa Skill store.

The back-end service runs as an AWS Lambda function. If the skill is slow to respond on first use, its probably because the Lambda function needs to cold-start as it hasn’t been used for a while.

The skill has actually been live since December 2017 (with a number of updates since then).